Ok, so the introduction 'What is HTML' already mentioned HTML tags and elements. So, let's first take a quick recap, then a closer look at tags and elements, and finally attributes will be introduced.
You can think of an HTML element and its tag(s) as a container for holding a specific type of content. They mark up a part of the content and define a specific meaning for it.
Tags are meant to be semantic, not presentational. Nonetheless, browsers apply a set of default styles to the content corresponding to the tag.
You learn more about styles and CSS, directly after creating your own website.
For example, the following tags are used to assign a specific role to a section of text, which also instructs the browser to apply a particular default styling: The <h1> tag ('h' for heading) is used for the biggest headline, <h2> tag for smaller headlines, etc., until <h6> for the smallest one. The <p> tag is used for paragraphs (so the browser puts space before and after a paragraph). Yet another example is the <blockquote> tag for literally quoting someone. A <citation> tag can be added to give appropriate credit to the author(s).
There are also tags that are not concerned with text and instead display other types of content. For example the <img /> tag for images and <video> for videos.
HTML is case-insensitive, so in theory <video>,<VIDEO> or even <vIdEo> are fine. But it is recommended to write HTML in lower case like this: <video>. Consistently writing in lower case is easier to read and a convention most developers follow.
As already explained in the introduction 'What is HTML' we inform the the browser about the content type by wrapping special characters around the content. You saw a few examples above with the shape of <sometag>, but that was only half the truth.
So, where does the content go?
The content is enclosed inside of two tags. An opening tag like <p> and a closing tag like </p>. The content comes between the two tags. Though, the closing tag is not always required by the browser, it is still highly recommended to provide a closing tag for every opening tag.
Notice that a forward slash (/) is used before the tag name to indicate it as a closing tag. This slash is required for closing tags! It's a common beginner error to forget it!
Also, keep in mind that the order of these special characters is important! Don't change the pointy brackets. >p< is not correct, neither is <p>some text<p/>!
The combined sequence of opening tag, content, and closing tag is known as an HTML element. Below is an image that shows a typical HTML element and its surrounding HTML tags (h1 tags)
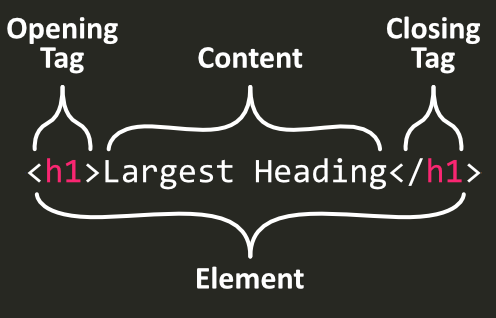 Shows an heading element as an exemplary HTML element. The element consists of a
 <h1> tag (opening tag), the text 'Largest Heading' and the closing tag </h1>.
Some HTML elements only consist of a single tag, a so called self-closing tag or void element. Such elements are typically used to insert or embed something in the page. For example the line break element looks like this <br />, a horizontal line like this <hr /> and an image tag like this:
<img src="bunny.jpg" />
Notice the / forward slash symbol right before the end of the tag. Nowadays, the slash is not required for modern browsers, but you can still use it to indicate a self-closing tag.
Since there is only one tag, there is basically no space to place content. Therefore attributes are use to attach additional information to a tag. In the image tag above an attribute is used to specify which image file should be displayed.
Attributes
An attribute consists of a name some special characters and a value:
- attribute name
= equals sign- attribute value surrounded by double quotes
"..."
So, for the image example from above the whole attribute is src="bunny.jpg", the attribute name is src and the attribute value is bunny.jpg.
Keep in mind that you have to put a space around attributes. This would not work: <imgsrc="surprisedpikachu.jpg"/>. There is no space between the tag name img and the attribute name src!
Another example is an anchor tag which is used to link to a web page:
<a href="https://roadmappy.com">Link to Roadmappy</a>
In this example, 'Link to Roadmappy' would be displayed as a link on the screen and https://roadmappy.com would be the destination URL the browser navigates to when clicking the link.
It's crucial to understand how URLs work for referencing images, web pages and style sheets (you'll learn about the latter soon). Otherwise you end up with missing images, broken links and unstyled pages. This course doesn't cover URLs in detail yet but here is already a teaser and some terms for your own research:
- relative vs. absolute paths
-
relative: When you use relative paths, the reference is always in relation to the original page. Let's say you are editing the home page (
index.html) of your website https://yourpage.com. This would be the URL https://yourpage.com or https://yourpage.com/index.html. When you link from the home page to a page with a relative link such as ./about.html, then the link resolves to https://yourpage.com/about.html. But when you edit a blog article https://yourpage.com/blog/cool-story.html and link with ./about.html to the page, then the URL resolves relative to the blog article. So, this would end up as https://yourpage.com/blog/about.html. Probably not what you want. So, a dot followed by a slash ./ is a relative reference (e.g. ./something). And leaving out the dot and slash is usually also a relative reference (e.g. something). Btw, there are also relative references with two dots ../something.
-
absolute: If you leave out the dot
. before the slash /, then you have an absolute reference. This works exactly the same from any web page. So, linking with /about.html to the about page works the same from the home page as it does from the blog article https://yourpage.com/blog/cool-story.html.
-
absolute including the domain: You usually don't want to inlcude the whole domain
https://yourpage.com in a link. So, your references should look like this some-page.html instead of this: https://yourpage.com/some-page.html
- hot linking external images vs. self-hosting images on your own web space:
- When you reference an image from an external page. Let's say a blog like
https://tobiobeck.com/assets/imgs/profile_pic_3.webp. Then you don't have control over the image. The blogger might delete the image any time and the image can't be displayed on your web page anymore.
- When you reference an image from your own web space, you keep control. The browser fetches the image data from your web server rather from someone else's server.
One last thing I want to mention: You can make comments in the HTML code which won't be displayed by the browser. You start a comment with <!--, write something in-between and end the comment with -->
<p>This will be displayed in the browser.</p>
<p>This is visible as well</p>
Most Common Elements
There are many more commonly used elements. Instead of tediously mentioning every element, you can look them up yourself in one of the following references:
Elements by category:
Next Steps: Nesting Elements
Now, that we covered the most important concepts about HTML elements you are basically ready to write your first lines of HTML code. The only thing left that you need to know is about nesting elements inside of each other.
Side Note
Pointy brackets are also known as 'arrow bracket', 'angle bracket' as well as 'less than' and 'greater than' signs.
The text file and data exchange format XML is similar to HTML and other than HTML XML is case-sensitive.